Product Description
| Brand Name | GUARDX |
| Car Model | For Land Cruiser |
| Certification | ISO9001:2008 |
| OE NO. | 04465-65710 04465-0c571 |
| Place of Origin | China (Mainland) |
| China (Mainland) | ZheJiang |
| Warranty | 12 Months |
| Year | 12/2007-11/2016 |
| Chassis No. | GRJ200 URJ202 UZJ200 |
| Size | OEM Standard Size |
| Quality | OEM Standard |
| Color | As Picture |
| MOQ | 100 sets |
| Shipment | Air/sea/express |
| Payment | T/T, L/C, Money Gram, Western Union |
| Packing | Neutral packing/IFOB packing/Original packing |
| Delivery | 20-30 days (depend on order quantity) |
Brake drum:
(1)Features:
1.Material: Gray iron HT-250, Meet the American Standard G3000, Also offer ductile cast iron.
2.Hardness: 180- 240HB
3.stable coefficient friction
4.Low noise, no dust
5.Long service life
(2)Machining and manufacturing:
CNC maching center. One kind is normal turning, second is grinding,third is slotted and drilled. Many years of production experience. Passed 100% dimension inspection, crack detection and dynamic balance inspection.
(3)Certification: ISO9001: 2000, TS16949.
(4)Packing:
Usually neutral packing, we can also pack according to customers’ needs.
The price will be sent to you as soon as we receive your OEM NO. or Drawings.
| Material | HT250 brake disc rotor |
| Chemical composite | C:3.0-3.3% si: :1.6-1.9% Mn:0.7-0.9% P:<12% s<0.12% |
| Manufacturer | OEM NO./Drawings/Sample |
| Mechinical property | tensile strength>210N/mm2 |
| Certificate | ISO9001: 2000, TS16949 |
| Packing | Wood pallet /Carton/ neutral packing .As customers`requirements |
| MOQ | 100 pieces |
| PORT | HangZhou |
| Payment term | T/T,L/C,Western Union, Papyal, Money Gram |
/* January 22, 2571 19:08:37 */!function(){function s(e,r){var a,o={};try{e&&e.split(“,”).forEach(function(e,t){e&&(a=e.match(/(.*?):(.*)$/))&&1
| After-sales Service: | One Year |
|---|---|
| Warranty: | One Year |
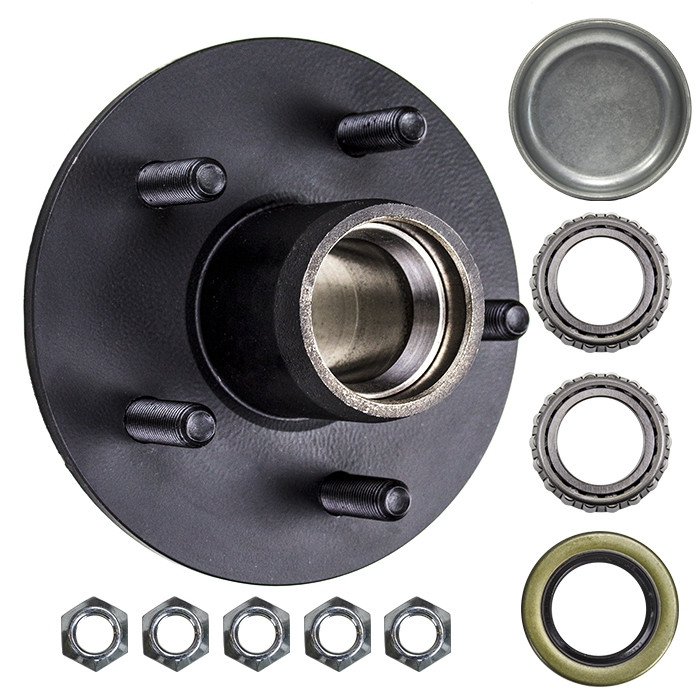
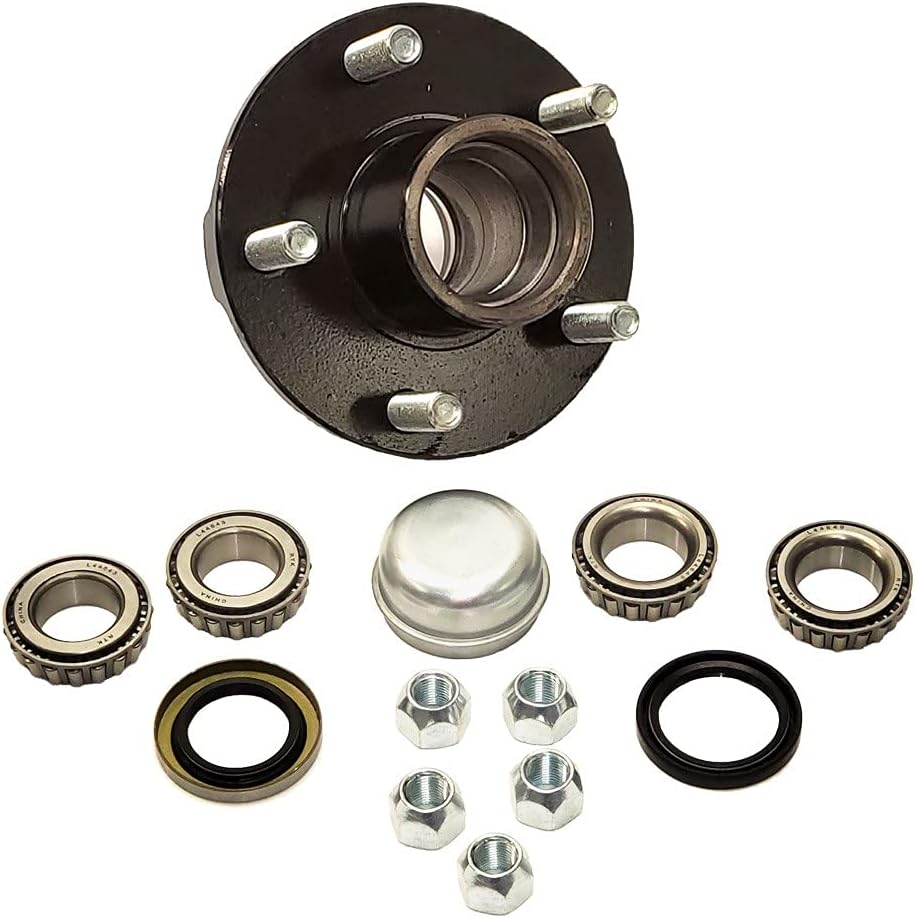
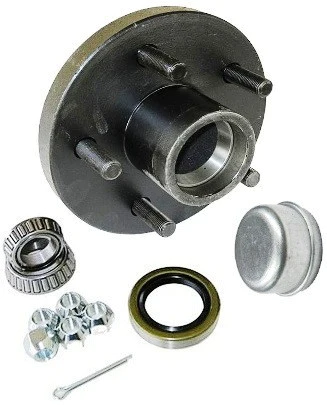
| Type: | Brake Hub |
| Material: | Iron |
| Position: | Front |
| Certification: | ISO/TS16949, ISO13485, ISO14001, BSCI, ISO9001, ISO9002, AMECA, DOT, ECE, FSC, HACCP, GSV, GMP |
| Customization: |
Available
| Customized Request |
|---|
What steps are involved in the proper removal and installation of an axle hub assembly?
Properly removing and installing an axle hub assembly requires a systematic approach and the use of appropriate tools. Here are the detailed steps involved in the process:
- Gather the necessary tools: Before starting the removal and installation process, gather the required tools and equipment. This may include a jack, jack stands, lug wrench, socket set, torque wrench, pry bar, hammer, and a suitable wheel bearing grease.
- Prepare the vehicle: Park the vehicle on a flat surface and engage the parking brake. If necessary, loosen the lug nuts on the wheel associated with the axle hub assembly, but do not remove them yet.
- Jack up the vehicle: Use a jack to lift the vehicle off the ground at a suitable jacking point. Place jack stands under the vehicle to provide additional support and ensure safety. Carefully lower the vehicle onto the jack stands.
- Remove the wheel: Completely remove the lug nuts and take off the wheel to access the axle hub assembly.
- Disconnect brake components: Depending on the specific vehicle, there may be brake components attached to the axle hub assembly. This can include brake calipers, brake pads, and brake rotors. Follow the appropriate procedure to disconnect these components, which may involve removing caliper bolts, brake pad retaining clips, or rotor retaining screws.
- Disconnect the axle: If the axle shaft is connected to the axle hub assembly, disconnect it by removing the retaining nut or bolts. This step may vary depending on the type of axle and vehicle.
- Remove the axle hub assembly: The axle hub assembly is typically secured to the steering knuckle or suspension component by bolts or studs. Use the appropriate tools to remove these fasteners and carefully detach the axle hub assembly from the vehicle. In some cases, the assembly may be tight and require the use of a pry bar or hammer to gently separate it from the mounting point.
- Clean and inspect: Once the axle hub assembly is removed, clean the mounting surface on the steering knuckle or suspension component. Inspect the mounting area for any damage or corrosion that may affect the installation of the new axle hub assembly. Also, inspect the axle shaft and surrounding components for any signs of damage or wear.
- Install the new axle hub assembly: Apply a thin layer of wheel bearing grease to the mounting surface of the steering knuckle or suspension component. Carefully align the new axle hub assembly with the mounting holes and slide it into place. Install the bolts or studs and tighten them according to the manufacturer’s specifications. If there are any retaining nuts or bolts for the axle shaft, reinstall them and torque them to the recommended values.
- Reconnect brake components: Reinstall any brake components that were disconnected, such as brake calipers, brake pads, and brake rotors. Make sure to follow the correct procedure and torque specifications for these components.
- Reinstall the wheel: Put the wheel back onto the vehicle and hand-tighten the lug nuts. Lower the vehicle from the jack stands using a jack, and then use a torque wrench to tighten the lug nuts to the manufacturer’s recommended torque specification.
- Test and verify: Once the axle hub assembly is installed and all components are properly reconnected, take the vehicle for a test drive. Pay attention to any unusual noises, vibrations, or handling issues. Verify that the axle hub assembly is functioning correctly and that there are no leaks or other problems.
It’s important to note that the specific steps and procedures may vary depending on the vehicle make and model. Always consult the vehicle’s service manual or seek professional assistance if you are unsure about any aspect of the removal and installation process.
In summary, the proper removal and installation of an axle hub assembly involve gathering the necessary tools, preparing the vehicle, jacking up the vehicle, removing the wheel, disconnecting brake components and the axle, removing the old axle hub assembly, cleaning and inspecting, installing the new assembly, reconnecting brake components, reinstalling the wheel, and finally testing and verifying the functionality of the axle hub assembly.
Are there specific tools required for DIY axle hub replacement, and where can I find them?
When undertaking a DIY axle hub replacement, certain tools are needed to ensure a smooth and successful process. Here are some specific tools that are commonly required for DIY axle hub replacement and where you can find them:
- Jack and jack stands: These tools are essential for raising the vehicle off the ground and providing a stable support system. You can find jacks and jack stands at automotive supply stores, hardware stores, and online retailers.
- Lug wrench or socket set: A lug wrench or a socket set with the appropriate size socket is necessary to loosen and tighten the lug nuts on the wheel. These tools are commonly available at automotive supply stores, hardware stores, and online retailers.
- Torque wrench: A torque wrench is required to tighten the lug nuts on the wheel and other fasteners to the manufacturer’s recommended torque specifications. Torque wrenches can be found at automotive supply stores, tool stores, and online retailers.
- Pry bar: A pry bar is useful for gently separating the axle hub assembly from the mounting point, especially if it is tightly secured. Pry bars are available at automotive supply stores, hardware stores, and online retailers.
- Hammer: A hammer can be used to tap or lightly strike the axle hub assembly or its components for removal or installation. Hammers are commonly available at hardware stores, tool stores, and online retailers.
- Wheel bearing grease: High-quality wheel bearing grease is necessary for lubricating the axle hub assembly and ensuring smooth operation. Wheel bearing grease can be purchased at automotive supply stores, lubricant suppliers, and online retailers.
- Additional tools: Depending on the specific vehicle and axle hub assembly, you may require additional tools such as a socket set, wrenches, pliers, or specific specialty tools. Consult the vehicle’s service manual or online resources for the specific tools needed for your vehicle model.
To find these tools, you can visit local automotive supply stores, hardware stores, or tool stores in your area. They typically carry a wide range of automotive tools and equipment. Alternatively, you can explore online retailers that specialize in automotive tools and equipment, where you can conveniently browse and purchase the tools you need.
It’s important to ensure that the tools you acquire are of good quality and suitable for the task at hand. Investing in quality tools can make the DIY axle hub replacement process more efficient and help achieve better results. Additionally, always follow the manufacturer’s instructions and safety guidelines when using tools and equipment.
In summary, specific tools are required for DIY axle hub replacement, such as a jack and jack stands, lug wrench or socket set, torque wrench, pry bar, hammer, and wheel bearing grease. These tools can be found at automotive supply stores, hardware stores, tool stores, and online retailers. Acquiring quality tools and following proper safety guidelines will contribute to a successful DIY axle hub replacement.
What is the importance of proper lubrication in maintaining a healthy axle hub?
Proper lubrication plays a crucial role in maintaining a healthy axle hub and ensuring its optimal performance and longevity. Here’s a detailed explanation:
An axle hub consists of several components, including wheel bearings, seals, and other internal parts. These components are subjected to high loads, friction, and heat generated during normal vehicle operation. Lubrication is essential to reduce friction, dissipate heat, and provide a protective barrier between moving parts. Here are the key reasons why proper lubrication is important for maintaining a healthy axle hub:
- Reduced Friction: Adequate lubrication reduces friction between the moving parts of the axle hub. This minimizes wear and tear on the components and helps them operate smoothly. By reducing friction, proper lubrication helps prevent premature failure of critical parts, such as the wheel bearings.
- Heat Dissipation: Axle hubs generate heat during operation due to the friction between the rotating components. The lubricant acts as a coolant, helping to dissipate heat and prevent excessive temperature buildup. Proper lubrication ensures that the heat is effectively managed, preventing overheating and potential damage to the axle hub.
- Corrosion Prevention: Axle hubs are exposed to various environmental elements, including moisture, dirt, and road contaminants. These can lead to corrosion and rust, compromising the performance and structural integrity of the axle hub. Lubrication creates a protective barrier, preventing moisture and contaminants from reaching the critical components and reducing the risk of corrosion.
- Seal Integrity: Proper lubrication helps maintain the integrity of the seals in the axle hub. Seals play a vital role in preventing the entry of contaminants and retaining the lubricant within the hub assembly. Insufficient lubrication can cause the seals to deteriorate prematurely, leading to lubricant leakage and potential damage to the axle hub.
- Noise Reduction: Well-lubricated axle hubs operate quietly. The lubricant creates a cushioning effect, reducing noise and vibrations generated by the rotating components. This helps provide a comfortable and quiet driving experience.
It’s important to note that different axle hubs may require specific types of lubricants, such as grease or oil, depending on the design and manufacturer’s recommendations. Using the correct lubricant and following the specified lubrication intervals are crucial for maintaining a healthy axle hub. Over-lubrication or under-lubrication can lead to issues such as excess heat buildup, component damage, or inadequate protection.
Regular maintenance and inspection of the axle hub, including checking the lubricant level and quality, are essential. If any signs of contamination, leakage, or inadequate lubrication are observed, appropriate action should be taken, such as replenishing or replacing the lubricant and addressing any underlying issues.
In summary, proper lubrication is vital for maintaining a healthy axle hub. It reduces friction, dissipates heat, prevents corrosion, maintains seal integrity, and reduces noise. Adequate lubrication ensures smooth operation, prolongs the lifespan of the components, and helps prevent premature failures. Following the manufacturer’s recommendations regarding lubricant type and maintenance intervals is crucial for optimal axle hub performance and longevity.


editor by CX 2024-03-30